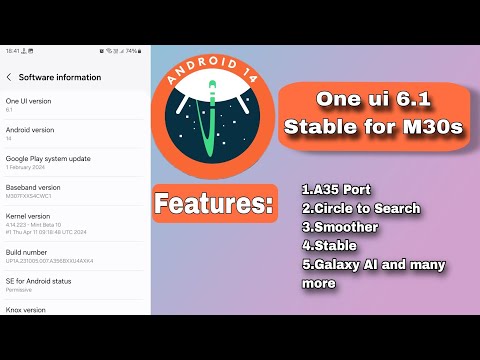
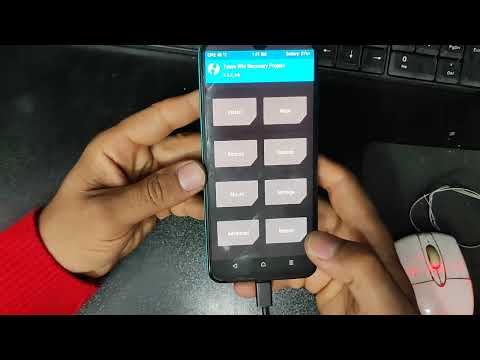
Samsung Galaxy M30s Upgrading To One UI 6.1 Based on Android 14 | M307f #M307f #Samsung #customrom #twrp #oneui6 Shot on Galaxy J7 MAX Disclaimer ⚠️⚠️⚠️ I'm Not Responsible For Your Bricked Devices or Dead Mobiles Do at Your own Risk Note: Make sure backup all of your data. After unlocking Bootloader All Data Will be wiped out Rom is beta and it contains Bugs 🐛 🐛 Join the M30s Off Topics And Help : Join the Official Samsung Galaxy M30s Group : +fbH73DSq0PMyYTJl Required files: 1. TWRP: 2. vbmeta: 3. odin: 4. Samsung USB Driver: (you should install the USB Driver on your PC) 5. The ROM File: 6. Kernel SU (if you want to root): Features: 1. Good lock support 2. Circle to search 3. Fully Debloated 4. Voice focus Bugs🐞🐞: 1. Quick panel bug (it is Fixable, I will make a video about it if possible) 2. Little UI Lags 3. Secure folder not working 4. Camera lags while switching between lenses (use Gcam Go) 5 .Bluetooth Audio Won't Work 6. WhatsApp Freezes 7. Frame drops in game play 8. Smart view Details of the ROM: 1. It is One UI 6.1 based on Android 14 2. 1 January 2024 security patch 3. Ported From S21 5g 4. Kernel SU Root included (just install the apk file of Kernel SU as usual) Credits: @Dhiren9611 was ported this ROM for M30s How To Install Custom Rom On Samsung Galaxy M30s (M307f/M307fs): 1. First Enable Developer Options in Settings By tapping Build Number 7 Times Go To Developer Options Toggle OEM Unlocking and USB Debugging 3. Power off your phone and connect to your PC or laptop and hold both volume keys 4. It boots into Download mode hold volume up key for device unlock mode then press volume up 5. When the erasing screen goes black, press both volume keys and press volume up for flashing TWRP 6. Open Odin, go to options tab, and uncheck auto reboot 7. Click on AP and select TWRP tar File, then click on cp, find the file, and flash it 8. Don't unplug the cable until last 9. Hold vol down + power key for 7 seconds, then quickly hold power + vol up key when the samsung logo appears lift the power key Booting Into TWRP Go to wipe Format data and type 'yes' 11. Select reboot and click on recovery 12. It is necessary. Otherwise, the TWRP recovery will be replaced by Stock Recovery 13. Go to wipe and check necessary partitions such as dalvik/cache, cache, system, vendor, product, data, and swipe 14. If you don't have an sd card, copy the ROM file to your phone from PC and find the ROM, then flash it 15. Wipe dalvik / ART cache and click reboot system 16. First Boot Takes sometime 17. Then, set up the phone as normal Timestamps: 00:00 - Intro 00:20 - Initial steps on phone 00:13 - Initial steps on PC 01:50 - Unlocking Bootloader 02:40 - Flashing TWRP 04:02 - Flashing Custom Rom 05:52 - First boot of the custom rom 06:37 - Initial setup 10:09 - First look of the rom 11:06 - Outro
- 7128Просмотров
- 1 год назадОпубликованоAsphalt Pro
Samsung Galaxy M30s Upgrading To One UI 6.1 Based on Android 14 | M307f
Похожее видео


Популярное
Новини