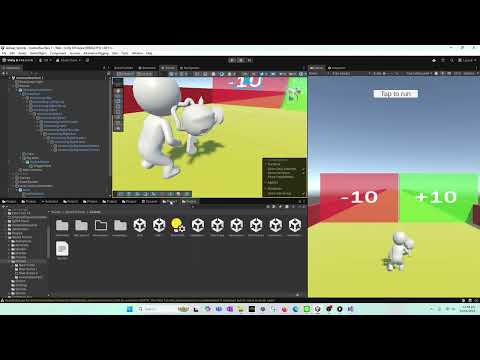
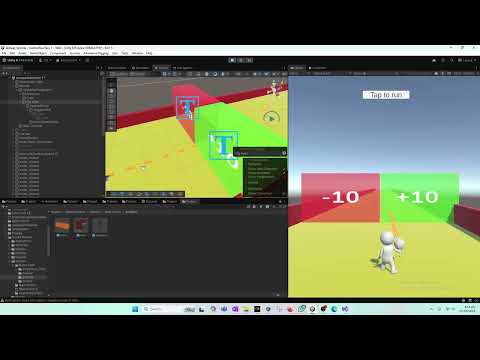
In this Unity tutorial, we continue directly from the previous episode and introduce one of the most powerful Unity tools for character animation: Animation Rigging. In this video, we use Unity’s Animation Rigging package to correctly attach the player’s hand to a gun, regardless of which animation is playing. We start by importing a lightweight gun model from Sketchfab. The selected model is optimized, using only a few thousand triangles and vertices, making it suitable for indie and solo developers who want realistic visuals without sacrificing performance. Once imported into Unity, we attach the gun to the player character’s hierarchy. At this stage, even though the gun is parented to the character, you’ll notice a major issue: when animations such as idle, run, or other movement animations play, the character’s hand does not stay aligned with the gun’s trigger. This breaks realism and immersion, especially in shooting or FPS/TPS games. To solve this problem, we use Unity’s Animation Rigging package. 🔧 Installing Animation Rigging We open Window → Package Manager, search for Animation Rigging, and install the package. Once installed, new rigging components become available inside Unity. 🦴 Rig Builder Setup On the player character GameObject (the one containing the Animator), we add a Rig Builder component. Rig Builder allows us to layer procedural animation on top of existing animations. Next, following Unity’s recommended workflow, we create a Rig GameObject as a child of the character’s armature. This rig acts as a layer that modifies animation behavior without breaking the original animation clips. 🎯 Trigger Point Creation Because most gun models do not have their pivot exactly on the trigger, we create an empty GameObject called TriggerPoint. This object is carefully positioned exactly where the character’s finger should rest on the trigger. This TriggerPoint becomes the target for our IK system. 🧠 Two Bone IK Constraint We then add a Two Bone IK Constraint, which is perfect for arms and legs. Inside the constraint: Root is set to the shoulder Mid is set to the elbow Tip is set to the hand The Target is assigned to the TriggerPoint on the gun. This tells Unity that no matter what animation is playing, the character’s arm must always try to reach this target. 🎮 Result Once configured, the results are immediate: Idle animation plays → hand stays on the gun Run animation plays → hand stays on the gun Any animation plays → hand stays locked to the trigger This happens in real time and blends perfectly with existing animations. We fine-tune the setup by adjusting: Gun scale Gun position TriggerPoint position and rotation This small adjustment phase is crucial for achieving a professional look. The closer the trigger point matches the actual trigger, the more realistic the animation feels. ⚠️ Known Issue (Next Tutorial) At the end of the video, we identify a movement issue where the player stops moving correctly when colliding with +10 / -10 trigger zones. We intentionally leave this unresolved and address it in the next tutorial, where we’ll debug and fix the movement logic. ✅ What You Learn in This Video: How Animation Rigging works in Unity How to install and set up Rig Builder How to use Two Bone IK correctly How to keep hands attached to weapons How to blend procedural rigging with animations How to fine-tune IK targets for realism This tutorial is essential if you’re working on: FPS or TPS games Weapon handling systems Mixamo animations Realistic character movement Indie or solo Unity projects
- 47Просмотров
- 1 неделя назадОпубликованоTasty Cherry Games
🔥 How to Make a Game Like Lost War ads Part 27 || | Fix Hand on Gun Using Two Bone IK (Step by Step)
Похожее видео


Популярное
Новини