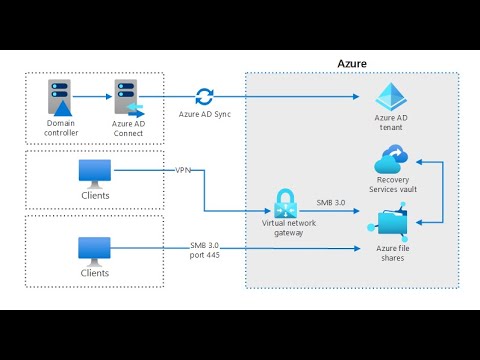
Welcome to our step-by-step guide on deploying Azure File Sync! In this video, we'll walk you through the entire process to centralize your organization's file shares in Azure Files while maintaining the flexibility, performance, and compatibility of an on-premises file server. Key Steps Covered: Create an Azure File Share: Set up an Azure file share in the same region where you want to deploy Azure File Sync. Configure Storage Account Settings: Ensure SMB security settings allow SMB protocol version, NTLM v2 authentication, and AES-128-GCM encryption. Enable storage account key access. Install Azure File Sync Agent: Install the Azure File Sync agent on a supported instance of Windows Server. Register the Server: Use the Server Registration UI to register the server with your Storage Sync Service. Configure Sync Groups: Set up sync groups to define the relationship between your Azure file share and on-premises server endpoints. Enable Cloud Tiering: Configure cloud tiering to optimize storage usage by tiering cold files to Azure Files. Monitor and Manage Sync: Use the Azure portal and PowerShell cmdlets to monitor and manage sync activities. By the end of this video, you'll have a comprehensive understanding of how to deploy Azure File Sync, ensuring efficient and scalable file storage management. Don't forget to like, comment, and subscribe for more tech tutorials! 👍🔔 Our videos make you an efficient end-user or a great functional consultant by preparing you for the Microsoft certification exams.
- 1503Просмотров
- 7 месяцев назадОпубликованоGuide To Learn
Deploying Azure File Sync: Step-by-Step Guide
Похожее видео


Популярное
Новини