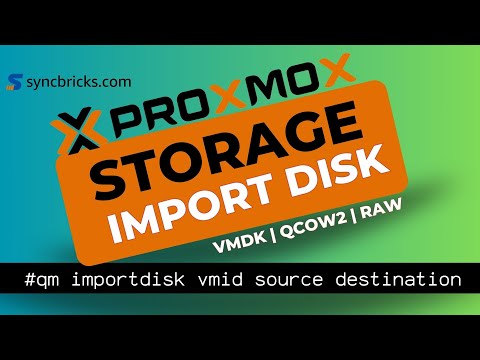
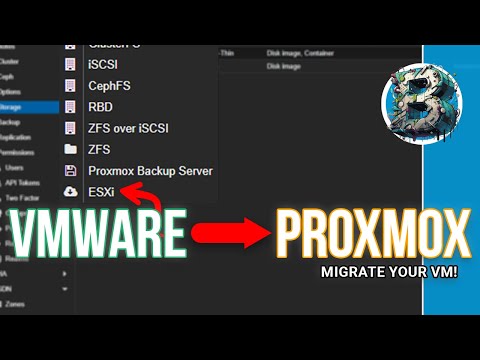
How to video demos mostly on Cohesity software I used this process to convert a Cohesity boot disk that was for VMware in vmdk format to be used in my proxmox lab. Yes Cohesity does have a KVM qcow2 disk you can download from the website. Learn how to convert a VMDK file to QCOW2 inside Proxmox VE and turn it into a reusable VM template for faster virtual machine deployment! In this step-by-step tutorial, you’ll see: How to upload your .vmdk image to Proxmox How to use qemu-img convert to change formats How to attach the converted QCOW2 disk to a VM How to prep it for cloning or template creation Whether you’re migrating from VMware, building a homelab, or managing enterprise virtualization, this guide will help you streamline VM template creation in Proxmox like a pro. qemu-img convert -f vmdk -O qcow2 qemu-img convert -f vmdk -O qcow2 /hdd/storage/import/ /vm/storage/ qm importdisk (VMID) (storage-name) qemu-img convert -f vmdk -O qcow2 /hdd/storage/import/ /vm/storage/ After converting the VM disk Create a blank VM Import and attach the boot disk and change the boot order qm import disk 501 ssd_storage --format qcow2 The VM should now work Proxmox VE (7.x or 8.x) A VMDK disk image Basic terminal access (root or sudo) 📦 More Proxmox Tutorials: 👉 How to Create Cloud-Init Templates 👉 Import Windows & Linux VMs Don’t forget to like, subscribe, and turn on the bell 🔔 for more Proxmox, virtualization, and homelab tutorials!
- 395Просмотров
- 2 месяца назадОпубликованоcohesitytechie
Proxmox VM Templates: VMDK to QCOW2 Conversion Step-by-Step
Похожее видео


Популярное
Новини