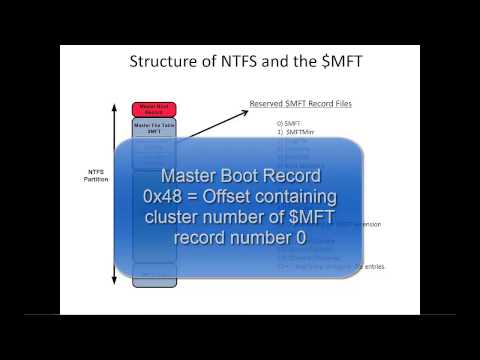
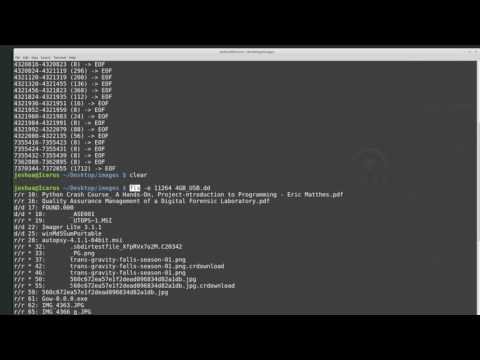
💡 Don’t miss a beat! Explore the entire Forensics playlist now 👇📱 🔐 In this detailed walkthrough, we explore how to perform digital forensics on an NTFS image using Kali Linux and powerful forensic tools like The Sleuth Kit and ewf-tools. This video will guide you through the process of analyzing and recovering data from a disk image, locating specific files and keywords, and extracting important artifacts using various forensic utilities. 🌐 Github ▸ 𓃥 Sleuth Kit ▸ 👮 Linux LEO ▸ 📂 NTFS Disk Image 💚 Support the Channel 🛍 Shop My Artwork & Custom Linux Tools 🎶 Music Credits 🔹 Music is provided by Chosic under the Creative Commons CC BY-SA 3.0 License 📢 Disclaimer This video is for educational purposes only. 🗒 Commands grep -abi cyberbullying evidence/ewf1 tr '[:cntrl:]' '\n' 👈 evidence/ewf1 | grep -abi cyberbullying echo "426596865/512" | bc echo "(426596865-(2048*512))/4096" | bc blkstat -o 2048 103893 ifind -o 2048 -d 103893 icat -o 2048 248 | file - icat -o 2048 248 | less icat -o 2048 248 👉 icat -o 2048 248 | antiword - | less 🔑 Timestamps: 00:00 Introduction and Overview 03:14 Installing ewf-tools 04:05 Mounting Image Using ewfmount 05:08 Searching Entire Image With Grep 06:58 Remove Unreadable Characters With tr 10:26 Determine Sector Offset 11:30 Installing bc (calculator) 11:50 Determine Sector Offset 12:50 Determine Sector & Cluster Size 13:17 Locate Exact Block Where Keyword Resides 14:50 Display details of specific block (blkstat) 15:44 Find MFT Entry For Particular Data Block 16:34 Output Contents of File Using Inode (icat) 18:26 Installing LibreOffice On Kali Linux 19:51 Open Recovered Document In LibreOffice 20:58 Install Antiword 21:42 Using Antiword to View MS Word Doc 23:13 Teaser For Next Video On Forensics 26:09 Thank My Subscribers 26:55 Outro
- 1113Просмотров
- 3 месяца назадОпубликованоFresh Forensics by Douglas Habian
Digital Forensics: Hunting Evidence on NTFS | Sleuth Kit in Kali Linux
Похожее видео


Популярное
Новини