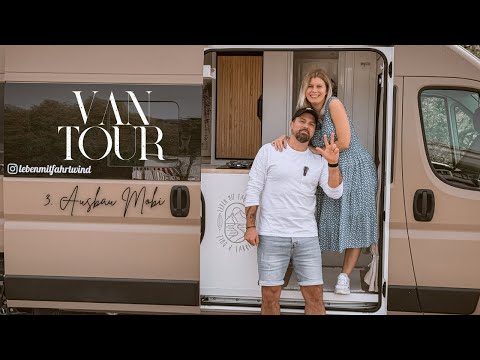
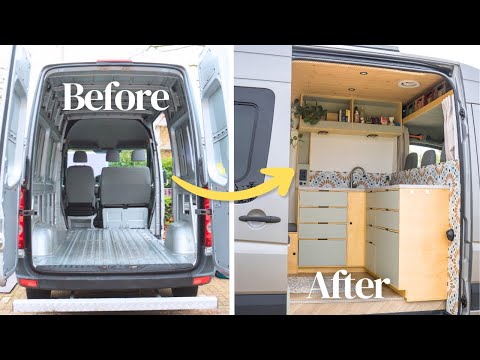
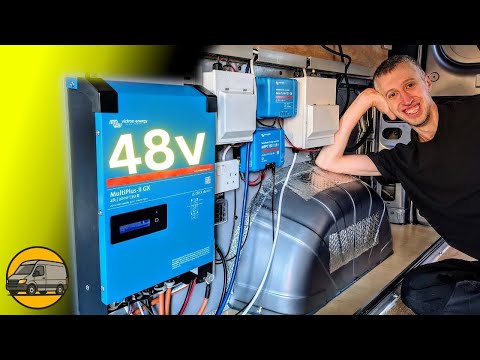
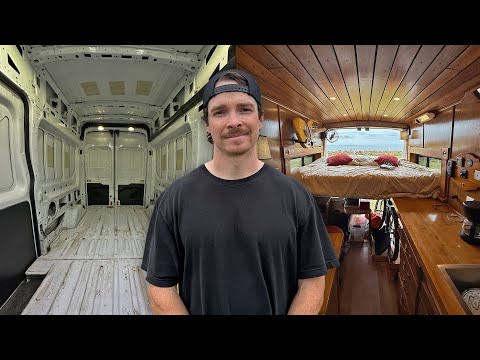
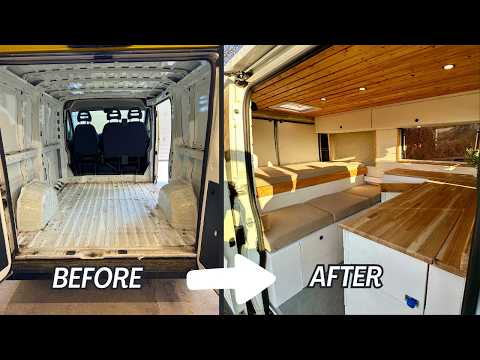
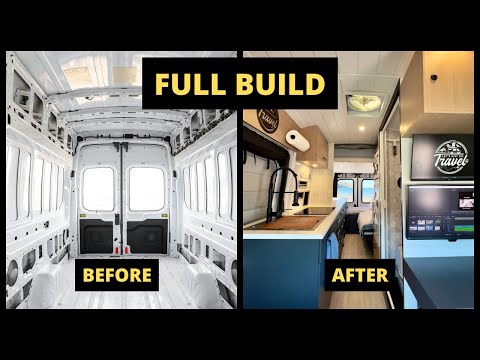
We bought our 2020 Peugeot Boxer (H2L2) in May 2024 and completed the camper van conversion in February 2025. It took roughly 80 days of pretty hard work and many hours spent watching YouTube tutorials to learn the skills and methods required. We took inspiration from @NateMurphy, @GregVirgoe, @DualEx, @OurVanPlan who've helpfully shared their knowledge and experiences. Good luck to anyone thinking about taking on a project like this, it’s hard but it’s worth it. We’ve lived in our camper van for over 6 months and we’re pleased to say our handiwork is holding up allowing us to fulfil our dream of travelling around Europe. ❗️We took great care with every single step to do things safely, always seeking advice from experts where necessary. Comprehensive parts list: 00:00 Our empty van 00:08 Clearing out 00:46 Sound deadening 00:54 Floor frame and insulation 01:52 Ceiling batons 02:06 Studs (part 1) 02:18 Window 03:25 Ceiling fan 03:56 Over-cab cupboard (part 1) 04:42 Insulating walls and ceiling 05:22 Running conduit for wiring (part 1) 06:01 Network antenna puck 06:28 Light switch board frame 06:38 Studs (part 2) 07:01 Spray foam insulation 07:08 Solar panels 08:01 Starter battery wiring 08:55 Bed frame 10:42 Charge controller, solar isolator, fuse board, fuse board isolator 11:52 Leisure battery 12:50 Rear view camera 13:24 Wall storage 14:03 Vapour barriering 15:37 Ceiling batons (part 2) 16:13 Cladding (part 1) 16:30 Light switch board (part 1) 17:13 Cladding (part 2) 17:39 Window frame (part 1) 18:03 Over-cab cupboard (part 2) 18:19 Cladding (part 3) 18:58 Network router 19:10 Wall socket 19:17 USB chargers 19:22 Cladding (part 4) 20:08 Over-cab cupboard (part 3) 20:36 Cladding (part 5) 20:41 Twin seat conversion 22:24 Cab crawl through (part 1) 23:17 Window frame (part 2) 23:28 Rear air vent 24:16 Cladding (part 6) 24:41 Cab crawl through (part 2 25:09 Tarpaulin door for crawl through 25:51 Rear door dead lock 26:24 Stretch carpeting cladding 27:00 Wooden trim (part 1) 28:13 Over-bed cupboard (part 1) 29:15 Wooden trim (part 2) 29:32 Over-bed cupboard (part 2) 30:37 Over-bed cupboard doors 31:17 Over-bed cupboard (part 3) 31:25 Cladding (part 7) 31:30 Central divider 31:47 Under-bed drawers (part 1) 34:03 Seat 35:11 Under-seat fridge sliding tray 36:03 Under-bed drawers (part 2) 36:27 Running conduit for wiring (part 2) 36:43 Bed boards (part 1) 37:17 Bed beams 38:02 Bed boards (part 2) 38:38 Custom black-out blind 38:48 Wooden trim (part 3) 38:57 Light switch board (part 2) 39:26 LPG locker (part 1) 41:51 Over-cab cupboard (part 4) 42:04 Painting 42:25 Kitchen units (part 1) 43:18 Kitchen unit baton 43:33 LPG locker drop vent 43:58 Kitchen units (part 2) 44:40 LPG locker (part 2) 44:50 LPG filler valve 45:13 Heating 45:29 LPG plumbing 45:57 Thermostat 46:02 Kitchen worktop 46:32 Two-ring hob (part 1) 46:52 Fresh water and electric tap system 47:36 Fresh water tank and grey water tank 47:52 Cupboard shelving 48:08 Storage hooks 48:20 Kitchen backboard 48:37 Kitchen splash back and heat shield 49:08 Kitchen tiling 49:31 Kitchen shelf 49:37 Kitchen LED lights 49:46 Kitchen sink 50:26 Kitchen drawers 50:55 Two-ring hob (part 2) 51:18 Retractable table 52:22 Cladding (part 8) 52:29 Bed reading lights 52:52 Cupboard behind seat 53:49 LVT flooring 54:06 Fridge tray lock 54:18 Mirror 54:30 Decorative magnetic strip 54:43 Double mattress 54:48 Curtain 56:05 Bed storage nets 56:19 Macrame storage nets 57:08 Carbon monoxide alarm 57:19 Washing 57:41 Final results
- 142195Просмотров
- 2 месяца назадОпубликованоHuw Hawkins
DIY Campervan Conversion - Full Build Timelapse (7 Months)
Похожее видео


Популярное
Новини