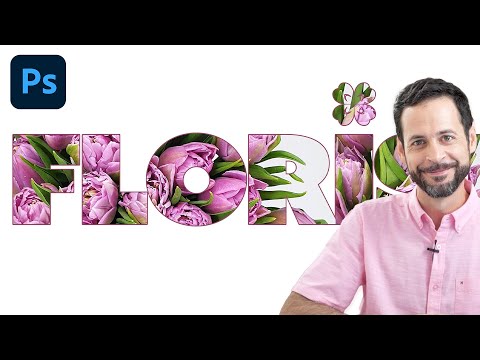
Place multiple images into your text with Photoshop by splitting a word into its individual letters and filling each letter with a different image! Download the written PDF on my Patreon: We start by creating a document and adding some text. Then I show you how to divide the text into separate letters and place a different image in each letter. Once the main effect is done, I show you how to change the background color behind the text, or make the background transparent, and how to quickly add layer effects, like a stroke or a drop shadow, to every letter at once! ► Get Photoshop here: ► Get the images used in this tutorial: Letter F: Letter U: Letter N: ► Download the PDFs! Join to support more videos on this channel and download all of my written tutorials as PDFs! Learn more: ► Variations of this effect: 1. Place a single image in text: 2. Fill multiple words with a single image: ► My related videos: 1. How to blend two images in Photoshop: 2. Photoshop's two must-know selection tools: 3. How to open images as layers: ► Video chapters: 00:00 - Intro 00:32 - Step 1: Create a new Photoshop document 01:25 - Step 2: Add your text 02:18 - Step 3: Resize the text with Free Transform 03:17 - Step 4: Convert the text into a shape 04:01 - Step 5: Make a copy of the shape layer for each letter 04:38 - Step 6: Delete the letters you don't need 06:50 - Step 7: Place an image in each letter 10:46 - Step 8: Group the shape and image layers 11:58 - Making the background transparent 12:20 - Change the background color 13:20 - Adding a stroke around the letters 14:12 - Add a drop shadow 14:51 - Centering the text in the document #photoshop #photoshoptutorial #texteffect
- 126175Просмотров
- 4 года назадОпубликованоPhotoshop Essentials
How to Place Multiple Images in Text with Photoshop
Похожее видео


Популярное
Новини